Saturday, November 2, 2024

Stylish Blanket Ladders to Build and Sell for Maximum Profit

Stylish Blanket Ladders to Build and Sell for Maximum Profit

Stylish Blanket Ladders to Build and Sell for Maximum Profit

Hey there, crafty entrepreneurs! Looking for a hot new product to build and sell? Look no further than blanket ladders! These functional and stylish pieces are becoming increasingly popular, and they're perfect for adding a touch of cozy charm to any home. Not only are they a great way to organize your throw blankets, but they also make a beautiful statement piece.

The best part? Building blanket ladders is relatively easy and doesn't require a ton of expensive materials. You can customize them to fit your style and target audience, making them a truly unique and profitable product.

Why Blanket Ladders Are a Great Business Idea

There are several reasons why blanket ladders are a fantastic product to build and sell:

  • High demand: The popularity of blanket ladders continues to rise, especially among those seeking stylish and functional home décor solutions.
  • Versatility: They can be used in various rooms, from the living room and bedroom to the entryway and even the bathroom.
  • Customization options: You can offer a wide range of designs, colors, and materials, appealing to a broader market.
  • Reasonable cost: You can build a blanket ladder with relatively inexpensive materials, allowing you to offer competitive prices.
  • Unique and handmade: Blanket ladders are a unique and personalized product, setting you apart from mass-produced items.

Types of Blanket Ladders

The world of blanket ladders is vast and full of possibilities! Here are a few popular types to consider:

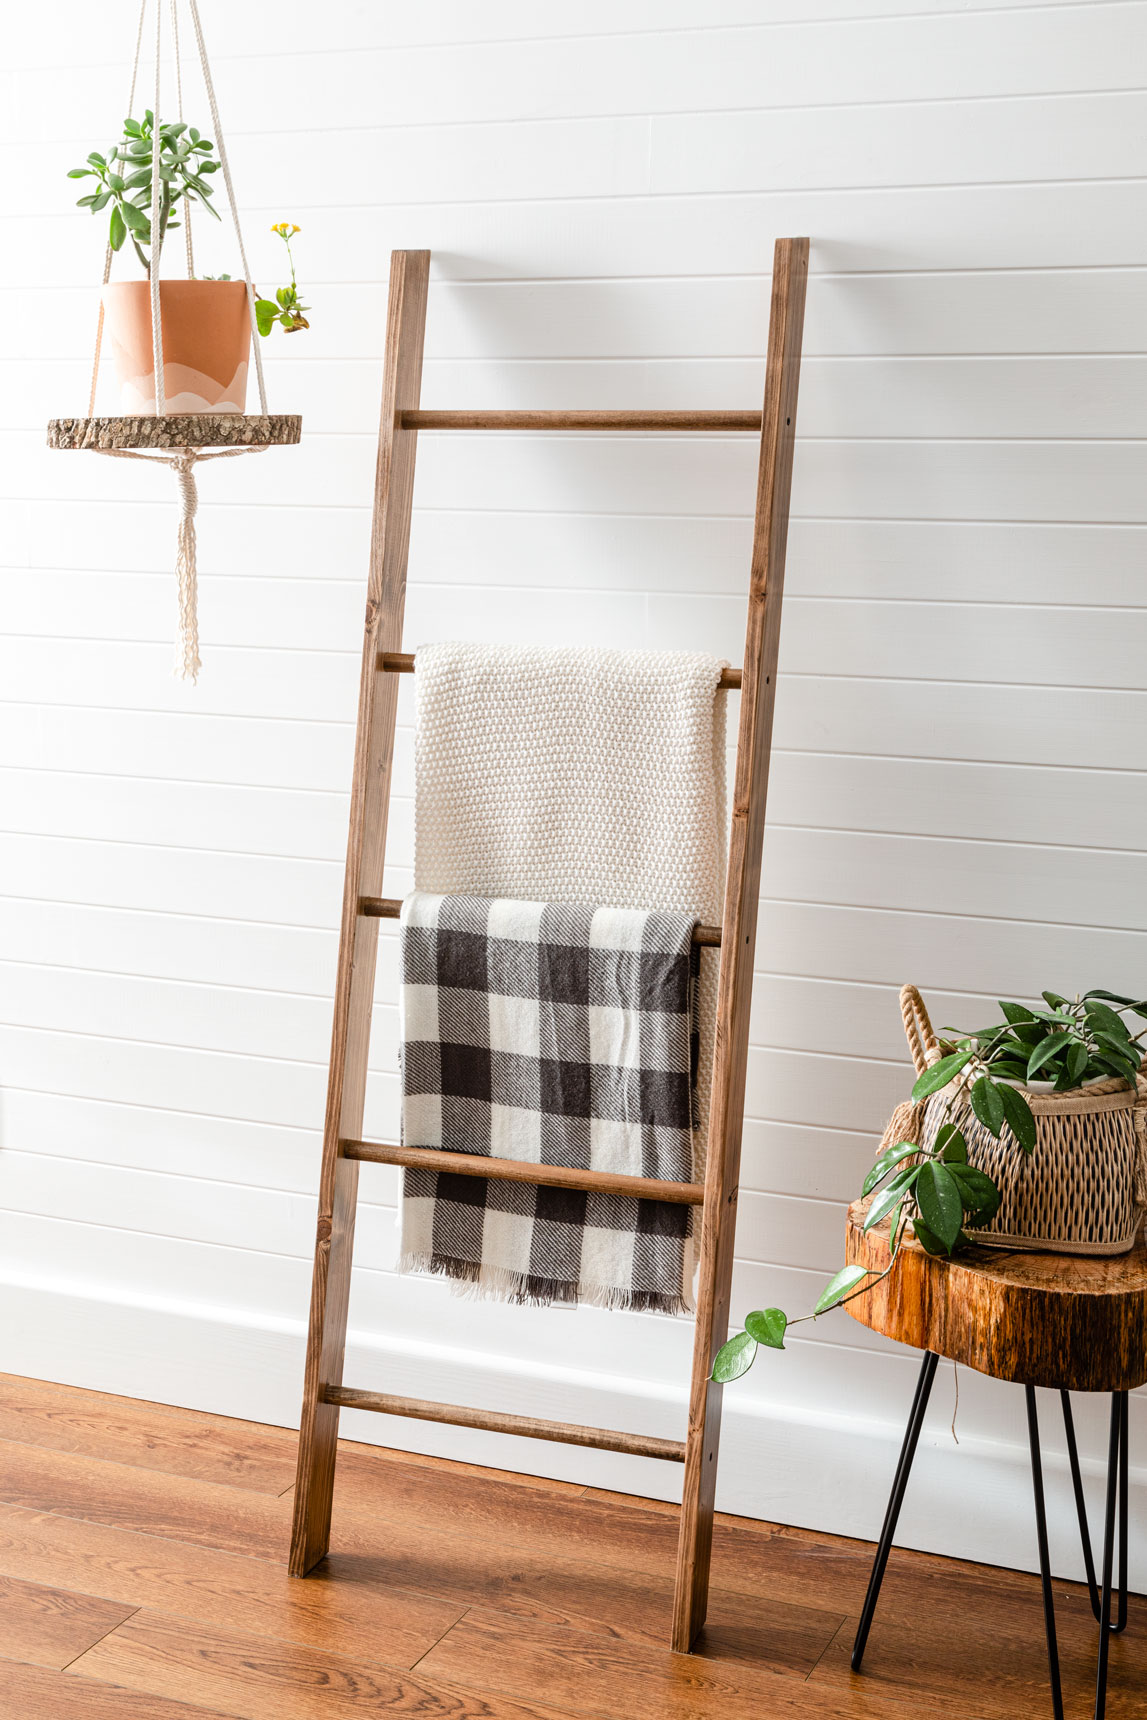
Traditional Blanket Ladders

These are the classic blanket ladders, usually made from wood with a simple design. They're timeless and versatile, fitting seamlessly into various interior styles.

Rustic Blanket Ladders

These ladders embrace a more natural and organic look, often using reclaimed wood or branches. They're perfect for adding a touch of warmth and character to a room.

Modern Blanket Ladders

Modern blanket ladders are sleek and minimalist, often made from metal or painted wood. They're ideal for contemporary interiors.

Wall-Mounted Blanket Ladders

These ladders are designed to be mounted directly onto the wall, saving floor space and adding a decorative touch. They're great for smaller spaces.

How to Build a Blanket Ladder

Ready to start building? Here's a step-by-step guide to building a traditional blanket ladder:

Materials

  • Wood planks (1x4 or 1x6) for rungs and sides
  • Wood glue
  • Wood screws
  • Sandpaper
  • Wood stain or paint (optional)
  • Measuring tape
  • Saw
  • Drill
  • Clamps
  • Level

Instructions

  1. Cut your wood: Cut the wood planks to the desired length for the rungs and sides. You'll need two pieces of wood for the sides, which should be slightly longer than the width of your desired ladder. The rungs should be the width of your desired ladder.
  2. Assemble the ladder: Using wood glue and clamps, attach the rungs to the sides, leaving equal spacing between each rung. Secure them further with wood screws.
  3. Sand the ladder: Once the glue has dried, sand the ladder to create a smooth finish. You can use different grit sandpaper for different steps in the sanding process, starting with coarser grit and finishing with finer grit.
  4. Stain or paint (optional): If desired, stain or paint the ladder to your liking. Allow the stain or paint to dry completely before moving on.
  5. Attach the ladder to the wall (optional): If you're creating a wall-mounted ladder, choose the desired location and drill pilot holes for mounting brackets. Secure the brackets to the wall using appropriate screws. Then, attach the ladder to the brackets.

Tips for Success

Here are a few extra tips to help you create beautiful and profitable blanket ladders:

  • Choose high-quality materials: Opt for sturdy and durable wood, like oak or maple, to ensure long-lasting quality.
  • Pay attention to detail: Make sure your cuts are precise, the joints are secure, and the ladder is level. These details will contribute to a professional-looking finish.
  • Experiment with design: Get creative with the design! Try different shapes, colors, and materials. You can even add decorative elements like rope or metal accents.
  • Promote your products: Showcase your beautiful blanket ladders on social media, create a website, and attend local craft fairs to reach your target audience.
  • Offer excellent customer service: Provide personalized service, prompt communication, and clear product descriptions to build strong customer relationships.

Pricing Your Blanket Ladders

When setting your prices, consider the cost of materials, your time investment, and the market demand for your product. You can research similar products online and in local shops to get an idea of competitive pricing. Remember to factor in your profit margin.

Marketing Your Blanket Ladders

Here are a few effective ways to promote your blanket ladder business:

  • Social media: Create engaging content that showcases your beautiful ladder designs. Use high-quality photos and videos to highlight their features and benefits.
  • Website: Build a user-friendly website where customers can browse your products, learn about your brand, and make purchases.
  • Local events: Participate in craft fairs, home decor shows, and other events to connect with potential customers in person.
  • Collaborations: Partner with other businesses or influencers in the home décor industry to expand your reach.
  • Online marketplaces: List your products on popular e-commerce platforms like Etsy, Amazon Handmade, and Shopify to reach a wider audience.

Commonly Asked Questions

What is the best wood to use for blanket ladders?

Hardwoods like oak, maple, and walnut are excellent choices for blanket ladders as they are sturdy, durable, and aesthetically pleasing. They're also resistant to scratches and dents, ensuring your ladder lasts for years.

How do I make my blanket ladder more unique?

There are countless ways to add a personal touch! Experiment with different finishes, like staining, painting, or distressing the wood. You can also incorporate rope, metal accents, or other decorative elements to create a one-of-a-kind piece.

How do I protect my blanket ladder from scratches and wear and tear?

Apply a sealant or a layer of polyurethane to the wood surface after sanding and staining. This will help prevent scratches and protect the wood from moisture.

Can I sell my blanket ladders online?

Absolutely! Many platforms, such as Etsy, Amazon Handmade, and Shopify, offer a convenient and accessible platform for selling handmade goods online.

How much profit can I make from selling blanket ladders?

The potential profit margin depends on the cost of materials, your time investment, and the pricing strategy. You can expect to earn a decent profit margin by selling well-crafted and beautifully designed blanket ladders.

Remember, success comes with dedication, hard work, and a genuine passion for crafting. Don't be afraid to experiment, get creative, and let your unique talents shine through. With a little effort and the right approach, you can build a thriving business selling stylish and functional blanket ladders!

Friday, November 1, 2024

DIY Wooden Benches That Are Perfect for Small Spaces

DIY Wooden Benches That Are Perfect for Small Spaces

DIY Wooden Benches That Are Perfect for Small Spaces

You know that feeling when you walk into a space and it just feels…off? Maybe it’s missing something, or maybe it just needs a little extra personality. Sometimes, all it takes is a simple addition like a bench to transform the whole vibe. And guess what? You can totally make your own bench, even if you're a DIY novice.

Building your own bench is a super satisfying project, especially when you can personalize it to fit your space and style. We’re talking about those small spaces that could use a little extra seating, but you don't want to overcrowd the area. Think entryways, hallways, bedrooms, or even tiny balconies.

Ready to tackle this fun and rewarding project? Let’s get started!

Choosing the Right Wood for Your Bench

First things first, you'll need to pick the right wood for your project. Think about the style you're going for and how much time and energy you want to put into it. Here’s a rundown of some popular choices:

Pine

Pine is super affordable and easy to work with, making it a great choice for beginners. It has a soft grain that’s easy to cut and sand, and it accepts stain and paint beautifully. However, pine is also a bit softer, so it might scratch or dent easily. Keep this in mind if you plan to use your bench in a high-traffic area.

Redwood

Redwood is known for its natural resistance to rot and insects, so it’s a great choice for outdoor projects. It has a beautiful reddish hue and a tight grain, making it a good choice for benches that you want to keep natural. However, redwood can be a bit pricier than other options.

Oak

Oak is super strong and durable, making it perfect for high-traffic areas. It also has a beautiful grain pattern that can be accentuated with a good stain. But, oak can be harder to work with than pine or redwood and is usually more expensive.

Cedar

Cedar is another great option for outdoor projects because it’s naturally resistant to rot and insects. It has a unique aroma that adds a touch of nature to your space. Like redwood, it’s a little pricey but worth it if you’re looking for a durable, long-lasting bench.

Designing Your Bench: Size and Style

Before you start cutting wood, take some time to plan out your bench. How long and wide do you want it to be? How high do you want the seat? Consider the dimensions of the space you'll be putting it in and the purpose of the bench. Will it be used for sitting, storage, or both?

Here are a few simple styles to get you started:

Traditional Bench

This classic style is simple and versatile. It typically features a rectangular seat supported by four legs. You can add a backrest for extra comfort, or keep it simple for a minimalist look.

Box Bench

If you need some extra storage space, a box bench is a great option. It features a lid that opens to reveal a compartment for storing blankets, books, or other items. You can add hinges and a latch to make the lid easy to open and close.

L-Shaped Bench

If you have a corner to fill, an L-shaped bench is a perfect choice. It can be used as a cozy reading nook or a seating area for small gatherings.

Materials You'll Need

Now, let’s gather the materials you'll need for your DIY bench adventure:

  • Wood (planks for the seat, legs, and back, if desired)
  • Saw (circular saw or hand saw)
  • Screwdriver or drill
  • Wood glue
  • Screws or nails
  • Sandpaper (various grits)
  • Wood stain or paint (optional)
  • Measuring tape
  • Pencil
  • Safety glasses
  • Work gloves
  • Clamps (optional)

Step-by-Step Instructions for Building Your DIY Bench

Ready to build? Let’s break down the process into easy-to-follow steps:

Step 1: Cut the Wood

Start by using your saw to cut the wood to the desired lengths for the seat, legs, and back (if applicable). Be sure to double-check your measurements before making any cuts!

Step 2: Assemble the Legs

If you're building a traditional bench, you'll need to assemble the legs. Cut four pieces of wood to the desired height for your bench. Using wood glue and screws, attach the legs to the bottom of the seat board.

Step 3: Attach the Backrest (If Desired)

If you’re adding a backrest, cut two pieces of wood to the desired length and height. Attach these pieces to the back of the seat board using wood glue and screws. Make sure the backrest is angled slightly backwards for comfort.

Step 4: Sand the Wood

Once your bench is assembled, it’s time to smooth out any rough edges and create a nice, even surface. Sand the entire bench using sandpaper, starting with a coarse grit and gradually moving to a finer grit.

Step 5: Finish the Wood (Optional)

If you want to add a protective layer or change the look of your bench, now is the time to stain or paint it. Use a brush to apply the stain or paint evenly, and allow it to dry completely.

Step 6: Enjoy Your New Bench!

Congratulations, you’ve officially created a unique and personalized bench for your space! Take some time to admire your handiwork and appreciate the joy of building something with your own two hands.

Tips for Success

Here are some tips to help you create a stunning DIY bench:

  • Measure twice, cut once. You don't want to have to redo any cuts, so take your time and double-check your measurements before you get to work.
  • Use clamps for a secure hold. Clamps will help you keep your pieces of wood aligned while you’re gluing and screwing them together.
  • Don’t be afraid to experiment. You can add your own personal touches to your bench, like adding decorative trim, carvings, or custom hardware.
  • Protect your work surface. Cover your work area with a drop cloth or some old newspapers to protect it from sawdust and spills.
  • Have fun! Remember, this is a DIY project, so don’t worry about perfection. Just relax, be creative, and have fun bringing your vision to life!

Thursday, October 31, 2024

Profitable Lawn Chair Ideas for Beginners to Build and Sell

Profitable Lawn Chair Ideas for Beginners to Build and Sell

Profitable Lawn Chair Ideas for Beginners to Build and Sell

Looking for a fun and rewarding side hustle? Building and selling lawn chairs is a great option for beginners. It's a relatively low-cost venture that requires minimal equipment and can be done from the comfort of your own home. Plus, with the right designs and a bit of creativity, you can create unique and attractive chairs that customers will love.

The key to success lies in finding profitable lawn chair ideas that are both practical and appealing. You want to create chairs that are comfortable, durable, and stylish, while also considering your target market and their specific needs. To get you started, here are some profitable lawn chair ideas that beginners can build and sell:

Classic Folding Chairs

Folding chairs are a perennial favorite, and for good reason. They're lightweight, portable, and easy to store. These chairs are a great choice for camping, picnics, tailgating, and other outdoor events. To create a unique and profitable folding chair, consider using different materials like recycled wood, bamboo, or even metal. You can also experiment with different folding mechanisms and add decorative features like laser-cut designs or colorful fabrics.

Key Features:

  • Lightweight and easy to carry
  • Durable and long-lasting
  • Comfortable and supportive
  • Easy to fold and store

Adirondack Chairs

Adirondack chairs are iconic and timeless pieces that bring a touch of rustic charm to any outdoor space. Their high back and angled seat provide excellent comfort, making them perfect for relaxing and enjoying the outdoors. You can use traditional cedar wood or experiment with other durable hardwoods like oak or teak. You can also add a unique twist by incorporating different colors, finishes, or even built-in cup holders.

Key Features:

  • Spacious and comfortable seating
  • Rustic and charming style
  • Durable and weather-resistant construction
  • Versatile for various outdoor settings

Lounge Chairs

Lounge chairs are designed for ultimate relaxation and comfort. These chairs typically feature low seats, wide arms, and often come with a footrest. They are ideal for patios, poolside, or simply enjoying a good book on a sunny afternoon. When designing your lounge chairs, consider using materials like weather-resistant fabrics, sturdy metal frames, or even woven wicker for a more traditional look. Add extra features like adjustable backs, built-in cushions, or umbrellas for a luxurious touch.

Key Features:

  • Luxurious and comfortable seating
  • Ideal for relaxing and lounging
  • Wide range of styles and materials available
  • Can be customized with additional features

Sustainable and Eco-Friendly Options

There's growing demand for sustainable and eco-friendly products, and lawn chairs are no exception. Consider using recycled materials like plastic bottles, wood scraps, or even repurposed metal. You can also explore using natural fibers like bamboo or hemp, which are renewable and have a lower environmental impact. By promoting sustainability, you can attract eco-conscious customers and stand out in the market.

Key Features:

  • Made from recycled or sustainable materials
  • Minimal environmental footprint
  • Appeals to eco-conscious consumers
  • Supports a responsible and ethical approach to production

Marketing Your Lawn Chairs

Once you've created your lawn chairs, it's time to get them in front of potential buyers. Start by building an online presence with a website or social media pages to showcase your products. Participate in craft fairs, farmers' markets, and local events to connect with customers directly. You can also partner with retailers or online marketplaces to expand your reach. Offer excellent customer service, respond to inquiries promptly, and build relationships with your buyers to create a loyal customer base.

Building and selling lawn chairs can be a rewarding and profitable venture. By focusing on quality, creativity, and a strong marketing strategy, you can transform your passion into a successful business.

How to Build Sturdy and Beautiful Wooden Benches for Outdoor Spaces

How to Build Sturdy and Beautiful Wooden Benches for Outdoor Spaces

Crafting Sturdy and Beautiful Wooden Benches for Outdoor Spaces

A wooden bench can be a valuable addition to any outdoor space. It offers a comfortable place to sit and enjoy the scenery, providing a spot for relaxation, conversation, or simply soaking in the sun. Constructing a wooden bench is a rewarding project that allows you to create a piece of furniture that complements your garden or patio while reflecting your personal style. This comprehensive guide will walk you through the process of building sturdy and beautiful wooden benches, from choosing the right materials to finishing touches.

Choosing Materials and Design

Wood Selection

The heart of any wooden bench lies in its wood. Selecting the right type of wood is crucial for both aesthetics and durability. Here are some popular choices:

  • Cedar: Known for its natural resistance to decay and insects, cedar is a durable and fragrant option. It often develops a beautiful silver-gray patina over time.
  • Redwood: Similarly durable and naturally resistant to decay, redwood also boasts a rich reddish-brown color that deepens with age.
  • Teak: A tropical hardwood with exceptional strength and durability, teak is renowned for its resistance to moisture and insects. It also develops a silver-gray patina over time.
  • Ipe: One of the hardest and densest woods, Ipe is incredibly durable, resistant to decay and insects, and boasts a rich reddish-brown color.
  • Pressure-Treated Pine: While not as elegant as some other options, pressure-treated pine is affordable, readily available, and offers good resistance to moisture and decay, making it suitable for outdoor use.

Design Considerations

Before diving into construction, carefully consider the design of your bench. This includes:

  • Style: Do you prefer a simple, classic design or something more ornate? Consider the overall aesthetic of your outdoor space.
  • Size: Determine the length and width of the bench to ensure it fits comfortably in your designated area and accommodates the number of people you intend to seat.
  • Features: Would you like armrests, a backrest, or storage space beneath the seat? These features can enhance both functionality and aesthetics.
  • Material Thickness: The thickness of the wood you choose will influence the bench's strength and stability. Thicker wood will generally be more durable and less prone to warping.

Construction Process

Preparing the Wood

Before you begin building, prepare your wood. This may involve:

  • Cutting: Cut the lumber to your desired dimensions using a saw. Ensure your cuts are precise and accurate.
  • Sanding: Sand all surfaces to remove rough edges and splinters. Begin with a coarser grit sandpaper and progress to a finer grit for a smooth finish.
  • Pre-Drilling: Pre-drill holes for screws to prevent wood splitting, especially when working with hardwoods.

Assembling the Frame

Start by assembling the frame of your bench. This typically involves:

  • Joining the Legs: Cut and assemble the legs, ensuring they are square and level. Use wood glue and screws or bolts for a sturdy connection.
  • Creating the Seat Support: Depending on the design, you may construct a solid seat support frame or use individual slats. Secure the seat support to the legs.
  • Attaching the Backrest: If your design includes a backrest, cut and attach the backrest pieces to the rear of the seat support frame.

Adding the Seat and Backrest

Once the frame is complete, attach the seat and backrest. This process may vary depending on your design. You can use:

  • Solid Seat: Cut a single piece of wood to the desired size and shape for the seat. Attach it to the seat support frame.
  • Slats: Cut individual slats for the seat and back. Secure them to the frame with screws or bolts.
  • Planks: Use multiple planks for a more substantial seat and backrest. Attach them to the frame securely.

Finishing Touches

Once your bench is assembled, add finishing touches to enhance its appearance and protect it from the elements:

  • Sanding: Smooth any rough edges or imperfections with fine-grit sandpaper.
  • Painting or Staining: Choose a paint or stain that complements your outdoor space and protects the wood from moisture and UV rays.
  • Sealing: Apply a sealant to protect the wood from weathering and keep it looking beautiful for years to come.
  • Adding Hardware: Consider incorporating decorative hardware like hinges, brackets, or bolts to enhance the visual appeal of your bench.

Tips for Durability and Longevity

To ensure your wooden bench stands the test of time, follow these tips:

  • Use high-quality wood: Invest in durable wood species that are resistant to decay and insect infestation.
  • Properly prepare the wood: Sand and treat the wood before assembly to prevent future damage.
  • Use strong adhesives and fasteners: Choose high-quality wood glue and screws or bolts for a sturdy and lasting connection.
  • Protect the wood: Apply a sealant and paint or stain to protect the wood from the elements and maintain its beauty.
  • Regular maintenance: Regularly inspect the bench for signs of wear and tear and promptly address any issues to prevent further damage.

Conclusion

Building a wooden bench is a rewarding project that allows you to create a custom piece of furniture that complements your outdoor space and enhances your enjoyment of it. By choosing the right materials, carefully considering the design, and following the construction steps outlined in this guide, you can craft a sturdy and beautiful bench that will provide a comfortable spot for relaxation and enjoyment for years to come.

Wednesday, October 30, 2024

Quick and Easy Beginner Woodworking Ideas to Try at Home

Quick and Easy Beginner Woodworking Ideas to Try at Home

Quick and Easy Beginner Woodworking Ideas to Try at Home

Hey there, fellow woodworkers! Ever dreamed of crafting your own beautiful furniture or home décor? Maybe you just want to create something unique and feel a sense of accomplishment. Well, guess what? You don't need years of experience or a fancy workshop to get started! We're going to dive into some awesome, quick, and easy beginner woodworking projects that you can tackle right at home. So, grab your safety glasses, dust off those tools, and let's get crafting!

Simple and Satisfying Projects

The best way to start is with projects that are simple, manageable, and let you learn the basics without feeling overwhelmed. Here are a few ideas that are perfect for beginners:

1. Coasters

Coasters are an excellent starting point because they're small, relatively quick to make, and you can experiment with different shapes, sizes, and finishes. Plus, they're super practical for protecting your furniture! You can use scraps of wood, plywood, or even old tiles to create coasters.

Here's what you'll need:

  • Wood (scraps or pre-cut pieces)
  • Saw (hand saw or jigsaw)
  • Sandpaper (various grits)
  • Wood glue
  • Finishing oil or sealant

Instructions:

  • Cut your wood into desired shapes and sizes.
  • Sand the edges and surfaces smooth.
  • Apply wood glue to the bottom of each coaster to create a protective layer (optional).
  • Finish with oil or sealant for a durable and water-resistant surface.

2. Cutting Boards

A cutting board is another classic beginner project, and you can make it as simple or intricate as you like. You can choose from hardwoods like maple or cherry, or experiment with softwoods like pine. Just remember to select wood that's food-safe and free of any harsh chemicals.

Here's what you'll need:

  • Wood (hardwood or softwood)
  • Saw (table saw or jigsaw)
  • Sandpaper (various grits)
  • Wood glue
  • Mineral oil or butcher block conditioner

Instructions:

  • Cut your wood to the desired size and shape.
  • Sand the edges and surface smooth.
  • Round the corners for safety.
  • Apply mineral oil or butcher block conditioner to protect the wood and make it water-resistant.

3. Picture Frames

Who doesn't love a good picture frame? You can create custom frames for your favorite photographs or artwork using wood, plywood, or even reclaimed materials. Get creative with the design! You can add decorative elements like moldings, paint, or even decoupage.

Here's what you'll need:

  • Wood or plywood (scraps or pre-cut pieces)
  • Saw (hand saw or jigsaw)
  • Sandpaper (various grits)
  • Miter saw or miter box (for clean angles)
  • Wood glue
  • Finishing nails or brads
  • Paint or stain (optional)

Instructions:

  • Cut your wood pieces to size, ensuring accurate angles for the frame.
  • Sand the edges and surfaces smooth.
  • Join the frame pieces using wood glue and finishing nails or brads.
  • Finish with paint, stain, or sealant as desired.

4. Simple Shelves

Want to add some extra storage space? Shelves are a great beginner project, and you can make them in different styles and sizes to suit your needs. Think about building floating shelves, corner shelves, or even bookshelf units. Start with basic rectangular shelves and work your way up to more complex designs as you gain confidence.

Here's what you'll need:

  • Wood (lumber or plywood)
  • Saw (circular saw or jigsaw)
  • Sandpaper (various grits)
  • Wood glue
  • Screws or nails
  • Brackets or supports (if needed)

Instructions:

  • Cut your wood to the desired size for the shelves and supports.
  • Sand all surfaces smooth.
  • Attach the shelves to the supports using wood glue and screws or nails.
  • Install the shelves to the wall using brackets or supports as needed.

Essential Beginner Woodworking Tools

Now that you've got some project ideas, let's talk about the tools you'll need to get started. Don't worry, you don't have to invest in a whole workshop right away. You can build a solid tool collection gradually.

  • Measuring Tape: Accurate measurements are crucial for woodworking. Get a tape measure with a clear markings and a sturdy hook.
  • Pencil: You'll be marking your wood a lot, so choose a pencil that's easy to grip and leaves a clear line.
  • Saw: For beginner projects, a hand saw or jigsaw is sufficient. A jigsaw allows for more intricate cuts.
  • Sandpaper: Essential for smoothing and finishing your wood projects. Start with a coarser grit for initial sanding and then move to finer grits for a smooth finish.
  • Wood Glue: A must-have for bonding wood pieces together. Choose a wood glue that dries clear and is strong.
  • Clamps: To hold pieces together while the glue dries. You can start with a few bar clamps and add more as needed.
  • Hammer: For driving nails and securing your projects.
  • Screwdriver: Choose a set with different sizes and types of screwdrivers to handle various screws.
  • Safety Glasses: Crucial for protecting your eyes from flying debris.

Safety First

Before you start crafting, it's essential to prioritize safety. Woodworking can be enjoyable, but it's important to be aware of potential hazards. Here are some safety tips:

  • Wear Safety Glasses: Always wear safety glasses to protect your eyes from flying debris.
  • Use Sharp Tools: Sharp tools are less likely to slip and cause injuries. Keep your blades sharp and in good condition.
  • Secure Your Workpiece: Make sure your workpiece is securely clamped before cutting or sanding to prevent it from moving.
  • Keep Work Area Clean: A cluttered workspace is a hazard. Clear away any debris and clutter before and after each project.
  • Don't Work When Tired: Fatigue can lead to mistakes and accidents. Don't work with tools if you're tired or feeling drowsy.
  • Follow Tool Instructions: Always read and understand the instructions for your tools before using them.
  • Be Aware of Surroundings: Pay attention to your surroundings to avoid tripping hazards or accidental bumps.
  • Use Protective Gear: Consider using gloves, ear protection, and a dust mask when necessary.

Tips for Success

Here are some helpful tips to make your beginner woodworking journey more enjoyable and successful:

  • Start Small: Choose projects that are manageable in size and complexity. You can always tackle larger or more challenging projects as you gain experience.
  • Practice Makes Perfect: Don't be afraid to practice your cutting, sanding, and finishing techniques. The more you practice, the better you'll get.
  • Take Your Time: Rushing through a project can lead to mistakes. Take your time and focus on doing each step carefully and accurately.
  • Ask for Help: If you encounter a problem or need guidance, don't hesitate to ask for help from a more experienced woodworker. There are also plenty of online resources and woodworking communities where you can find support.
  • Be Patient: Woodworking is a skill that takes time and practice to develop. Don't get discouraged if your first projects aren't perfect. Just keep practicing and learning, and you'll be amazed at how much progress you make.

Commonly Asked Questions

Here are some frequently asked questions about beginner woodworking:

1. What kind of wood should I use for my first projects?

For your first projects, you can use softwoods like pine or fir. They are easier to work with and more forgiving of beginner mistakes. As you gain experience, you can experiment with hardwoods like maple, oak, or cherry.

2. Do I need a fancy workshop to start woodworking?

Not at all! You can start woodworking in a garage, basement, or even a small corner of your house. All you need is a safe workspace and basic tools.

3. What are the best resources for learning woodworking?

There are tons of online resources available, including woodworking blogs, YouTube channels, and websites with step-by-step tutorials. You can also check out books from your local library.

So, there you have it! A whole world of woodworking awaits, and you've got everything you need to get started. Embrace the process, enjoy the learning curve, and most importantly, have fun! Happy crafting!

How to Make Wooden Wall Clocks with a Nautical or Coastal Theme

How to Make Wooden Wall Clocks with a Nautical or Coastal Theme

Crafting Nautical and Coastal-Themed Wooden Wall Clocks

Embark on a creative journey to craft exquisite wooden wall clocks that exude the charm of the nautical and coastal life. These timepieces, crafted with your own hands, will not only adorn your home but also serve as a cherished reminder of your love for the sea. This comprehensive guide will equip you with the necessary knowledge and techniques to embark on this rewarding endeavor.

Choosing the Right Wood

The choice of wood is crucial for both aesthetic appeal and durability. Opt for woods known for their strength, stability, and suitability for carving and finishing. Here are some excellent options:

  • Mahogany: This classic wood offers a rich reddish-brown hue and natural beauty, enhancing the nautical theme.
  • Walnut: With its deep brown color and intricate grain patterns, walnut provides a sophisticated and elegant touch.
  • Oak: Known for its durability and robust character, oak is ideal for rustic coastal designs.
  • Cherry: Its warm reddish-brown tones and smooth finish create a timeless and sophisticated look.
  • Pine: This lightweight wood is easily workable and cost-effective, perfect for beginners.

Design Considerations

Before embarking on the construction, it's essential to conceptualize the design of your nautical or coastal wall clock. Consider the following aspects:

Theme and Style

  • Nautical: Incorporate elements like ship wheels, anchors, ropes, seashells, or compass roses.
  • Coastal: Explore beach-inspired designs featuring seashells, driftwood, lighthouses, or seagulls.
  • Rustic: Emphasize natural wood textures and finishes, with a focus on weathered elements.
  • Modern: Utilize clean lines, geometric shapes, and contemporary color palettes.

Clock Face Design

  • Traditional Roman Numerals: These classic numerals add a touch of elegance and timelessness.
  • Arabic Numerals: Modern and easy to read, Arabic numerals are a versatile choice.
  • Custom Designs: Get creative with unique designs using stencils, stamps, or even woodburning.

Color Palette

  • Blue and White: Evokes the serenity of the ocean and sky.
  • Red, White, and Blue: Celebrates the colors of the American flag.
  • Earthy Tones: Natural hues like browns, greens, and beiges complement coastal themes.
  • Black and White: Creates a striking contrast for a modern or minimalist look.

Tools and Materials

To craft a beautiful wooden wall clock, you'll need the following tools and materials:

  • Wood: Choose your desired wood type and thickness.
  • Saw: A table saw, circular saw, or hand saw for cutting the wood to size.
  • Drill: For creating holes for the clock mechanism and hands.
  • Sandpaper: Various grits for smoothing the wood and creating a polished finish.
  • Clock Mechanism: Includes the movement, hands, and mounting hardware.
  • Wood Glue: For securing the clock face and other components.
  • Wood Stain or Paint: To achieve your desired color and finish.
  • Polyurethane or Wax: For sealing and protecting the wood.
  • Clamps: To hold pieces together during assembly.
  • Measuring Tape: For accurate dimensions and layout.
  • Pencil: For marking and transferring designs.

Construction Steps

Now, let's dive into the step-by-step process of crafting your wooden wall clock:

1. Cutting the Wood

  • Measure and cut the wood for the clock face and any additional components like a frame or decorative elements.
  • Use a saw and a straight edge to ensure precise cuts.
  • Sand the edges to remove any rough spots.

2. Creating the Clock Face

  • If desired, use a stencil or woodburning tool to create a design on the clock face.
  • If using numerals, carefully mark their placement with a pencil.
  • Use a drill and a drill bit slightly smaller than the size of the clock mechanism to create a central hole for mounting.

3. Assembling the Clock

  • If building a frame, assemble it using wood glue and clamps.
  • Once the glue is dry, attach the clock face to the frame or the wood base.
  • Mount the clock mechanism from the back, ensuring the hands align correctly.

4. Finishing and Sealing

  • Sand the entire clock thoroughly to achieve a smooth surface.
  • Apply your chosen wood stain or paint, following the manufacturer's instructions.
  • After the stain or paint dries, apply a sealant like polyurethane or wax for protection.

Adding Nautical and Coastal Details

To elevate your wooden wall clock to a true nautical or coastal masterpiece, incorporate these decorative elements:

  • Carve or Cut Out Nautical Motifs: Anchors, compass roses, seashells, or even a small ship silhouette.
  • Incorporate Rope or Twine: Use rope to create a decorative border around the clock face or as a hanging strap.
  • Add Seashells: Glue seashells around the clock face or on the frame for a beachy touch.
  • Use Driftwood: Incorporate pieces of driftwood for a rustic coastal look.
  • Create a Miniature Lighthouse: Craft a small wooden lighthouse and place it near the clock face.

Unique Ideas for Nautical and Coastal Clocks

Let your creativity flow with these unique ideas:

  • Ship Wheel Clock: Create a clock face resembling a ship's wheel, using wooden spokes and a central hub.
  • Compass Rose Clock: Incorporate a compass rose design into the clock face, representing navigation and exploration.
  • Lighthouse Clock: Design a clock face resembling a lighthouse, using a tall, slender shape and a lantern on top.
  • Seashell Clock: Arrange seashells around the clock face to create a unique and natural design.
  • Driftwood Clock: Use pieces of driftwood to form the clock face and frame, incorporating natural beauty.

Conclusion

Crafting a nautical or coastal-themed wooden wall clock is a rewarding experience that allows you to express your creativity and create a truly unique and personal timepiece. With careful planning, attention to detail, and a passion for the sea, you can transform your woodworking skills into a beautiful and cherished piece of art. Your home will be graced with a distinctive reminder of the beauty and charm of the nautical and coastal life.

Friday, October 25, 2024

How to Build Floating Shelves That Are Functional and Stylish

How to Build Floating Shelves That Are Functional and Stylish

Building Functional and Stylish Floating Shelves

Floating shelves offer a sleek and modern aesthetic while maximizing space in any room. They're perfect for showcasing your favorite books, plants, or decorative items. However, building floating shelves doesn't have to be a daunting task. This guide will equip you with the necessary knowledge and steps to create functional and stylish shelves that enhance your home's interior.

Planning Your Floating Shelves

Before diving into the construction, take some time to plan your shelves. This crucial step ensures your shelves fit your needs and style.

Determine the Location and Size

Select the wall where you want to install your shelves. Consider the purpose of the shelves, the existing décor, and the available space. Measure the desired width and depth of your shelves. Remember that floating shelves typically have a shallower depth than traditional shelves, so choose a size that accommodates your items.

Choose Materials

Wood is a popular choice for floating shelves due to its versatility, durability, and aesthetic appeal. Consider using hardwood like oak, maple, or walnut for a luxurious look or opt for pine or plywood for a more budget-friendly option.

Decide on the Style

Do you prefer a minimalist look with clean lines or a more rustic aesthetic? Determine the desired style to guide your material selection and design. Consider adding decorative elements like molding or trim for a more intricate look.

Materials and Tools

Once your plan is finalized, gather the following materials and tools:

  • Wood planks (based on your desired dimensions)
  • Wood stain or paint
  • Finishing oil or sealant (optional)
  • Screws (for attaching shelves to the wall)
  • Wall anchors (if necessary)
  • Stud finder
  • Tape measure
  • Level
  • Saw (to cut wood if needed)
  • Drill
  • Sandpaper
  • Pencil

Building the Floating Shelves

Now, it's time to bring your vision to life. Follow these steps to construct your shelves:

Cut the Wood

Using your saw, cut the wood planks to the desired size and length. Ensure clean and precise cuts for a professional look.

Sand the Wood

Smooth out any rough edges or imperfections with sandpaper. Sanding provides a smooth surface for staining or painting.

Stain or Paint the Wood

Apply your chosen stain or paint to the wood planks. Use a brush or roller for even application and allow the finish to dry completely.

Installation

With your shelves ready, you're one step away from enjoying their functional beauty.

Locate Studs

Use a stud finder to locate wall studs where you will mount your shelves. This ensures secure support.

Mark and Drill Pilot Holes

Using your pencil and level, mark the positions for your shelf supports on the wall. Drill pilot holes at the marked spots to prevent splitting the wood when driving screws.

Attach the Shelf Supports

Attach the shelf supports to the wall using screws. If you are not hitting a stud, use wall anchors for extra support.

Mount the Shelves

Carefully slide the shelves onto the supports, ensuring they are level.

Final Touches

To enhance your shelves' durability and appearance, consider applying a finishing oil or sealant after installation. This step protects the wood from moisture and dirt, ensuring your shelves last longer.

Finally, arrange your favorite items on the shelves and admire your handiwork!

Creative Ideas for Stylish Floating Shelves

Enhance the style of your floating shelves with creative touches.

  • Accent lighting: Add LED strip lights underneath the shelves for a modern and captivating effect.
  • Wallpaper or fabric backing: Instead of plain wood, cover the back of the shelves with wallpaper or fabric for a personalized and artistic touch.
  • Floating shelves of different sizes and shapes: Create visual interest by using shelves of varying widths and shapes to break up the monotony.

By following these steps and incorporating creative ideas, you can build functional and stylish floating shelves that elevate your home's interior while showcasing your treasured possessions.